One of the building blocks to a successful restorative class is having a great plan. Below is one of my favourites. You will also need to check you have set up all the props necessary for a restorative class. Additionally, you can add to the mood with music, low lighting such as candles, scents and the warm calming energy you bring to your students.
Opening – Welcome
Good morning/afternoon/evening everyone for those of you who have not practiced with me before I am … . Welcome to today’s restorative class. The following sequence includes gentle yoga postures designed to bring you a sense of calm.
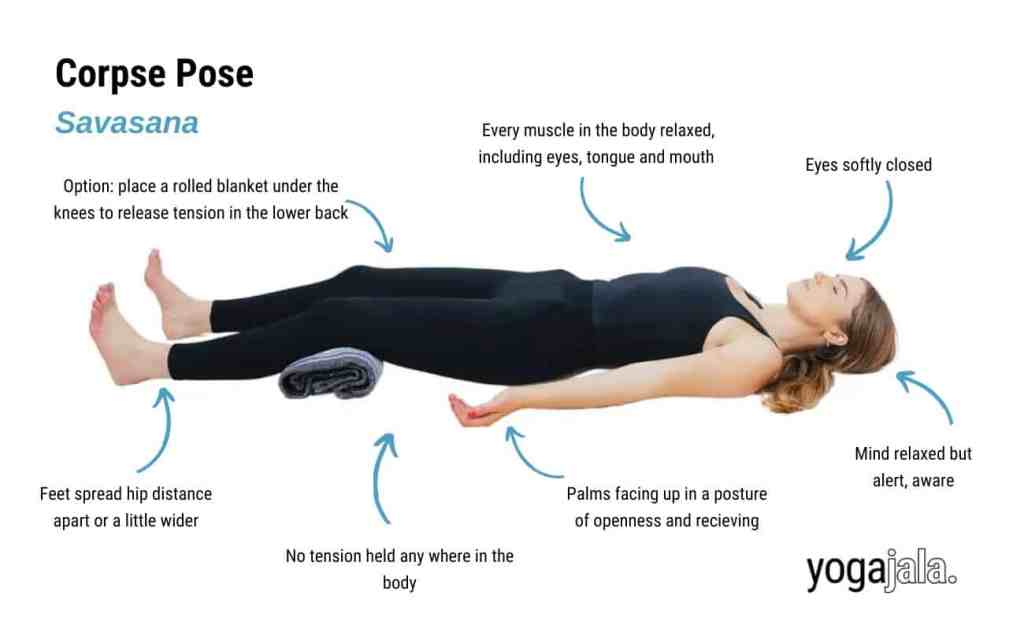
Cue Opening Savasana whilst explaining restorative yoga.
- Come to lie on your back.
- You may want to bend your knees and gently lift your hips to place your lower back flat on the mat. Then, straighten your legs an place them back down.
- You may also want to roll your shoulder blades under, to bring your whole spine down to the mat.
- Allow space between your legs.
- Let your toes fall away from your midline.
- Hands face up to the sky beside your hips in a gesture of surrender.
Opening – what is restorative yoga?
Restorative yoga practice is great to balance with an active schedule or as an alternative when you may be feeling under the weather.
Our parasympathetic nervous system (a network of nerves which allow relaxation after periods of stress) is activated by the practice of restorative yoga.
It has many benefits:
- relaxes the body
- stills the mind
- increases the bodys capacity to heal
- boost immunity
- enhances your mood
In this process of relaxing you may feel vulnerable – if this happens stay with the posture focusing on breathing and allowing the sensation to pass.
Whilst still in opening Savasana connect with breath through 3-part yogic breathing.
Opening mantra
Opening class with a mantra of 3 Oms honours yogic tradition, connecting us to all living things through the vibration sound and creates peace, preparing the body for practice.
Pranayama
Pranayama/breathing techniques also help settled the mind and body ready for practice. There are many forms of pranayama one could use, Nadi Shodhana/Alternate Nostril Breathing is a good choose before a restoriative class as it is calming.
Other benefits of Nadi Shodhana are:
- Boosts concentration.
- Calms the nervous system.
It can be practiced by anyone at anytime, but care should be taken by those who have a cold.

Cue class to …
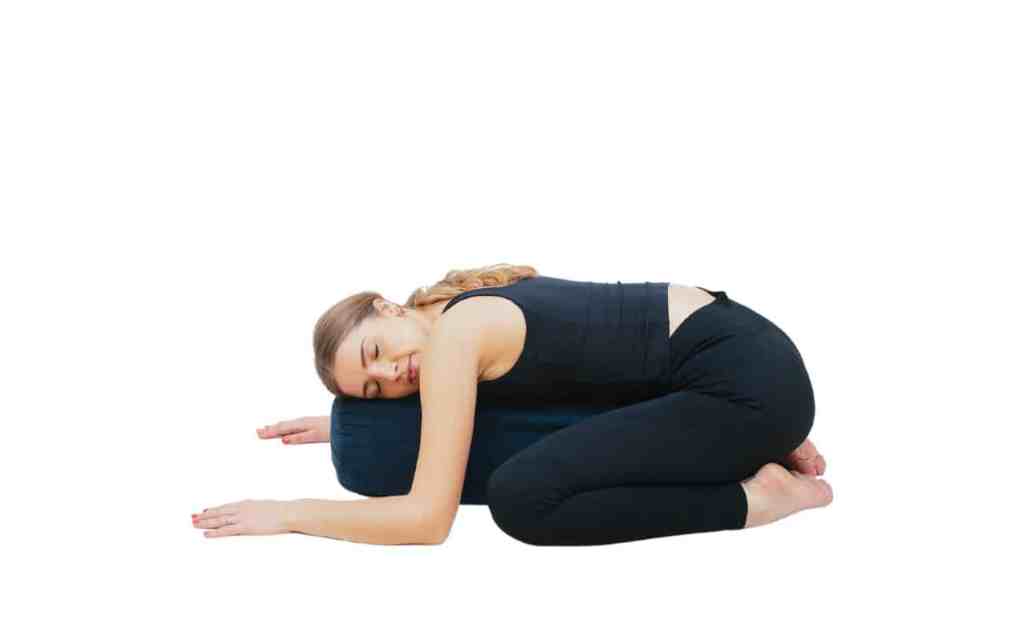
1. Supported Child’s Pose (Salamba Balasana)
Props: bolster
Cues:
- Come forward into table top – optional cat-cow.
- Toes together.
- Bolster between legs.
- Come to lie on top of your bolster.
- Head to either side.
- Hold 3-5 minutes.
- Settle and surrender.
- With each breath soften and unclench.
- As you rest gravity is pulling you down releasing tension in your hips and thighs.
- Soften the muscles in your lower back allowing your tailbone to fall towards your heels.
- Shoulder blades spread across your back as your arms dangle like vines towards the floor.
- Let go of any tension in your jaw and between your eybrows.
- This posture teaches us to breath more deeply into our back body.
Benefits
- Stretches hips, and spine.
- Encouarges deeper back body breathing.
- Emotionally healing as it allows people to feel fully supported.
Counterposes
- Table top to thread the needle.
- Table top – walk hands forward and do figure of 8 with the spine.
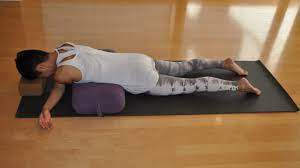
2. Restorative Shoulder Release Pose
Props: bolster, 1-2 blocks, 1-2 blankets.


Cues:
- Option to cover your mat with a blanket for added comfort.
- Place the bolster horizontally across your mat – this is where you will rest your front body below your shoulder blades.
- At the top of your mat place a block or two with a blanket on top – this is where you will rest your head.
- Lie onto the bolster supporting your front body below your shoulder blades.
- Cross your left arm over your right in the space between your props (you will switch this the second time around).
- Chin to rest on your arms with the weight of your head on the blocks.
- Check you can breath with ease.
- Hold for 3-5 minutes.
- Switch sides!
Benefits
- Relieves mental fatigue and senses of pressure and responsibilities.
- Pressure in the belly is grounding.
- Releases tight shoulders. This is useful for those who spent alot of time in their daily lives sitting or looking at devices.
- Releases tight upper back.
Counterpose
- Seated arm raises.
- Shoulder rolls.
3. Restorative Variation of Shoulder Stand (Sarvangasana)
Props: bolster/block, belt.


Cues:
- From Savasana bend both knees.
- Inhale lift hips. Place bolster or block under hips.
- Exhale place hips down on the bolster.
- Inhale lift both feet from the floor. Option to place belt around centre of both feet.
- Exhale straighten legs towards the sky.
- Lower back still flat on the mat.
- Hold for 3-5 minutes.
Benefits
- Relieves tired legs and feet.
- Healing and calming effect of redirecting blood.
Counterposes
- Savasana
4. Reclined Big Toe Pose (Supta Padangushtasana)
Props: bolster, belt, blanket (optional).

Cues:
- From Savasana place your bolster parallell to the right side of your mat.
- From savasana bend your right leg.
- Lift right leg off the ground bringing your belt to oop around the centre of your right foot.
- Inhale straighten your right leg. Option to keep leg bent if more comfortable.
- Exhale allow your leg to come to the right, resting on the bolster.
- Option to bring left palm onto your left hip to keep your sitting bones down.
- Hold for 3-5 minutes.
- Inhale and slowly bring your right leg back up.
- Exhale release the belt.
- Place your right leg down on the floor, returning to savasana.
- Repeat on the opposite side.
Benefits
- Stretches hamstrings, calves, groin, inner thighs and lower spine.
- BKS Iyengar stats this posture can reduce Sciatica.
Counterpose
- Child’s Pose (Balasana).
5. Reclined Cobbler Pose (Baddha Konasana)
Props: 2 blocks (or more), bolster, blanket (optional), eye pillow (optional).

Cues:
- Place your bolster down the centre of your mat towards one end.
- Turn your body so your hips are in front of the bolster and you are about to lie down.
- Bend both knees.
- Keeping the soles of your feet together support your knee joints as you open your legs at your knees.
- You can place blocks or bolsters under your knees to support them in this opening.
- Gently recline onto the bolster so your heart and hips are opening at the same time.
- Hold for 3-5 minutes.
- Option to place balnket over you and eye pillow on eyes to aid relaxation.
Benefits
- Hips and heart space is opened in this posture stretching these areas and releasing emotions stored here.
Counterpose
- Child’s Pose (Balasana).
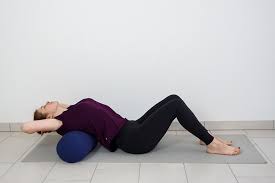
6. Supported Back Bend
Props: bolster, blocks (optional).


Cues:
- Place your bolster horizonally across your mat.
- Lie onto your bolster on your thorasic spine under your shoulder blades.
- If this feels too extreme on your back use some blocks to support your head.
- Place your arms out to the side on rest on your belly.
- Knees can be bent or straight.
- Hold for 3-5 minutes.
Benefits
- Promotes good posture.
- Stretchens back, shoulder and chest.
Counterpose
- Forward fold from Dandasana allowing spine to curve.
Spinal Twist with Bolster
Props: bolster, blanket (optional).


Cues:
- Place your bolster down the centre of your mat.
- Bring your right hip next to the end of the bolser.
- Place one leg on top of the other at ninety degrees.
- Bring your hands either side of the bolster.
- Walk your hands down the bolster.
- Allow the centre of your chest to rest here.
- Turn your head away from the legs, if this is comfortable.
- Hold for 3-5 minutes.
- Repeat on opposite side.
Benefits
- Increases spine mobility.
- Relaxes the body and mind.
This is the last pose of the class so time can be given here for students to do some gentle movement of their own or you can guide a transition straight to Savasana.
Closing Savasana
Cues:
- Remove any props, or place your bolster under your knees.
- Scan your body from toes to your head noticing each sensation.
- Release any control of your breath.
Exit Cues:
- Gradually bring some movement back into your body.
- Wriggle your fingers and toes.
- Make circles with your wrists.
- Make circles with your ankles.
- Gently move your head from left to right.
- Ben both knees.
- Place your right arm out, straight from your shoulder.
- Turn your body to the right hand side.
- Rest here in the fetal position for a moment.
- Bring your left palm down in front of your face or your hest and use this pressue to bring your body up to seated.
Closing Mantra
This can be whatever mantra you want, including the simple but powerful ‘Om Shanti, Shanti, Shanti’. Om is our universal mantra connecting us to all living things and Shanti means peace.
Place hands together at heart centre. Bring your hands up to your third eye (space between your eyebrows). Bow your head – ‘Namaste’.
Namaste.
To see guided videos follow @calm_collective_yoga on instagram.

Leave a comment